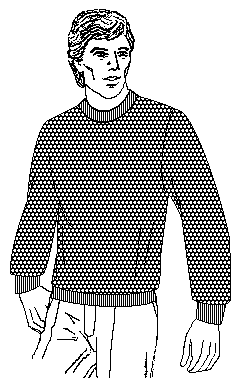
Men’s Tuck Stitch Pullover

Sizes S-M-L-XL, Finished Width 38 (42-46-50)inches
Materials Required: approximately 16-20 oz 3/15 or fingering weight yarn. The original pattern was made with Nomis Excellence 3/15; I have since used Yarn Country Newlon successfully. Newlon is softer than Excellence, and tends to stretch more. Be sure to make a sample, wash and dry, and take gauge from the laundered swatch, since tuck patterns shrink quite a bit lengthwise, and often grow widthwise in the first wash.
Gauge: 6.5 sts, 14 rows = 1 inch in tuck pattern.
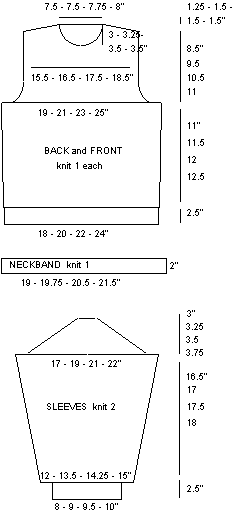
Tension: approximately 7-8 with Newlon, 9-10 with Excellence. This will vary with machine and dye lot of yarn. It is necessary to either match the gauge successfully or rechart, following schematics at the end of this pattern.
Back
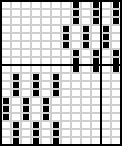
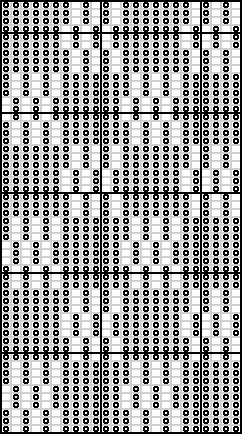
CO 117 (129-143-155) sts in K1, P1 rib. RC 000. MT-2. K even to RC 24. Transfer all sts to MB. Inc 1 st. 118 (130-144-156) sts. Insert pattern and lock on row 1. MT. K 2 rows Stockinette, programming pattern on these rows. Change to tuck. Add weights. I usually leave the ribber comb attached and hang several claw weights evenly spaced on the top edge of it. When comb hits the floor, either roll the fabric around it and baste together with ribber wire, or remove ribber comb and use bar weights or triangle hangers and small bell weights.
Working in tuck pattern throughout, inc 1 st both sides every 40 rows a total of 3x. 124 (136-150-162) sts. K even to RC 154 (160-168-174) for a 13.5 (14-14.5-15)inch side seam. Adjust length here if desired, and make a note of RC. This will also cause the RC number at the shoulder and at the beginning of the front neck shaping to change. Add or subtract the same number of rows at these two points that were added or subtracted for armhole length.
Shape armhole. BO 7 (7-10-10) sts at the beg of the next 2 rows, then dec 1 st both sides EOR 5 (7-8-11)x. 100 (108-114-120) sts remain. K even to RC 272 (292-314-328).
Shape shoulder. Dec for each shoulder, placing sts into HP EOR, as follows:
S: 3 sts 8x, 2 sts 1x
M: 3 sts 10x
L: 4 sts 2x, 3 sts 8x
XL: 4 sts 4x, 3 sts 6x
Always wrap first HP needle to prevent a hole in the fabric. When P side will be the right side of the fabric, hide the wrap; remove the st on the HP needle with a transfer tool, wrap the HP needle, then return st to needle. When shoulder decs are completed, remove remaining 48 (48-50-52) sts on WY, then remove each shoulder separately on WY.
Front
Break off and set aside a 1 yd length of yarn. Work same as for Back until RC 250 (268-286-300), ending COR.
Shape Front Neck. COR. Make a note of pattern row. With the reserved piece of yarn, BO center 16 sts. Place all sts L of center 0 into HP and work right shoulder section. K 1 row to L. BO at L edge EOR, 3 sts 1x, 2 sts 5x, 1 st 3 (3-4-5)x. This completes neck shaping. K even to RC 119 (132-147-155). Shape shoulder same as for Back
Return L shoulder sts into their hooks with transfer tool. Reprogram machine for proper pattern row, and work L shoulder to correspond, reversing all shaping. Remove each shoulder separately on WY. Join R shoulder seam.
Neckband
CO 143 (147-153-161) sts in K1, P1 rib. RC 000. T 5/5. K even to RC 20. Transfer all sts to MB. T 9. K 1 row. Remove on WY.
Join neckband to garment. Wrong side of garment toward machine, push neck edge evenly down over gate pegs, having garment in front of gate pegs, and approximately 1/4 inch of fabric extending over pegs for seam allowance. Push needles through fabric. Now rehang MC loops at top of neckband into needle hooks. Close latches, and manually take needles back, one or two at a time. This pulls neckband stitches through fabric. Carefully lift garment up off gate pegs. Check to be sure there are no dropped stitches.
Turn up lower edge of band. Pick up 1 strand of CO edge onto EOR needle. BO loosely to enclose neck seam. This technique also works very well with cut and sew necklines. Push the neckline onto the gatepegs so that the needle hooks come through the fabric under the machine stitching line.

Sleeves
Begin above cuff. CO 78 (88-92-98) sts with WY and ravel cord, ending COR. Insert pattern and lock on row 1. Change to MT and MC. RC 000. K 2 rows Stockinette, programming pattern. Change to tuck and add weights. Inc 1 st both sides every 14 (12-10-10) rows 16 (18-22-23)x. 110 (124-136-144) sts. K even to RC 228 (236-242-250) or desired length of sleeve seam. Shape cap. BO 5 sts at the beg of the next 4 rows, 2 sts at the beg of the next 8 rows. Dec 1 st at the beg of the next 18 (30-40-46) rows. BO 2 sts at the beg of the next 8 rows, 3 sts at the beg of the next 2 rows, 4 sts at the beg of the next 2 rows, 5 sts at the beg of the next 2 rows. BO remaining 10 (12-14-16) sts.
Cuff
CO 59 (67-71-75) sts in K1, P1 rib. RC 000. T 5/5. K even to RC 25, ending COL. Transfer all sts to MB. Right side of fabric toward machine, rehang MC loops from CO edge onto same needles, doubling 19 (21-21-23 sts evenly across. MT. K 1 row. BO. Make other cuff the same.
Finishing
Sew sleeves into armholes, sew side and sleeve seams, close neckband side seam. Work in yarn ends. Wash and dry garment. I prefer to join seams in the tuck sections with my sewing machine, use my drum linker, or slip stitch crochet the seams. I find it very hard to mattress stitch this fabric neatly. It might be a good idea to practice seaming on swatches before doing it on the actual garment so that you know how the fabric will react.


Original pattern was uploaded to Clearwater Knits website and copyrighted in 1997
