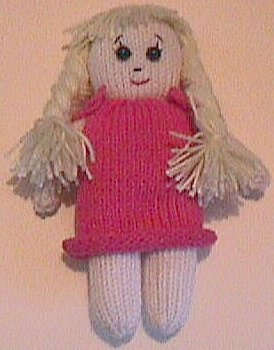
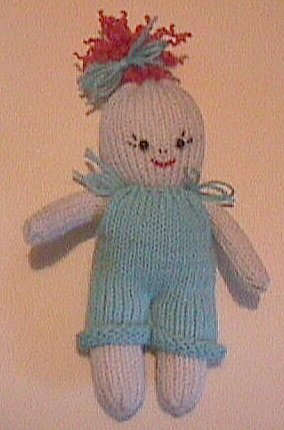
Little Sock Doll


This doll is approximately 6″ tall when made with the yarn listed. Using other yarns will change the finished size.
Materials Required: approximately 1 oz Mary Lue’s Symphony 4/15 for body, approximately 1 oz in color suitable for hair, small amounts of desired colors for clothing, 1 oz fiberfill stuffing. 1 pair wiggle eyes or 4-6 mm beads for eyes. Matching sewing thread. Tapestry needle and long embroidery needle with a large eye.
Head and Body. Automatic CO 32 sts, leaving a long tail for seaming later. RC 000. K even to RC 44, ending COR.
Leg. Place 16 sts left of center 0 into hold position. RC 000. Working on right 16 sts, knit even to RC 20. Transfer every other st to adjacent needle, then move all doubled sts inwards to fill the empty needles. 8 needles now have 2 sts each on them. K 1 row. Clip yarn. Thread 2 strands of MC yarn into tapestry needle and take off remaining 8 sts. Gather tightly and knot. Work other leg the same.
Arm. Automatic CO 12 sts. K even to RC 20. Transfer every other st to adjacent needle, then move the doubled sts inwards to fill the empty needles. K 1 row and clip yarn. Thread 2 strands of MC into tapestry needle and remove remaining 6 sts. Gather tightly and knot. Make other arm the same. Sew arm seam. Arm may be stuffed lightly if desired. However, I leave the long yarn ends from the double yarn used to tie the knot; tuck them inside as the arm seam is sewn, and use only this yarn as the filling. I find that on this tiny doll the arms stick straight out if I use fiberfill in them, so I prefer not to use it.
Stuffing. Sew leg seams up to crotch, filling lightly with fiberfill after seam is sewn halfway, and again when seam is finished. Do not overstuff. Gather top of head tightly and fasten securely. Sew head and body seam using cast on tail. Stuff firmly after sewing every inch or so, making sure top of head is nice and round, not puckered. Make sure all stitching is securely fastened, especially at the crotch. I usually knot pairs of yarn ends together to make sure nothing can come unsewn later, then thread each yarn tail separately into needle and poke all the way through the body at an angle, pull up, and clip next to fabric. When tension is released, the yarn tail will spring back inside and be hidden.
Face. First tie a double strand of yarn tightly around the head/body section about halfway down from cast on to crotch. This should be just slightly more than halfway toward the top of the head from the crotch level.
This is very simple soft sculpture. If using wiggle eyes, glue them on in proper position, about halfway between neck and cast on edge. Experiment with eye placement and eye shape. Wiggle eyes come in many sizes and shapes, and aren’t very expensive, so do take the time to try out two or three different ones.
Bead eyes are also widely used. I prefer the round black ones, sizes 4 or 6 mm, which are sold in craft departments and manufactured especially for soft sculpture eyes, but other varieties will also work. I like to slightly sink the eyes. First mark correct placement with large head sewing pins; just push the pin straight in at point where you think the eyes should go. Use the large head pins, because they are approximately the same size as eyes, and will give a pretty accurate indication of what the finished face will look like.
When satisfied with the eye placement, Cut a LONG piece of matching sewing thread. Fold in half and poke fold through embroidery needle eye. String one bead on thread, then pass needle through loop to securely fasten bead to thread.
Insert needle next to one marking pin, go through face, pinching fabric firmly, and exit next to other marking pin. Remove both pins now. String second bead onto thread, passing needle all the way through it. Skip over a tiny stitch, reinsert needle where it just came out, and exit right next to first bead, pulling up firmly on the thread to keep beads slightly indented. Go through first bead, skip over a tiny stitch, reinsert needle next to first bead, go through head and exit next to second bead. Pull thread snug and fasten off securely under second bead. Now pass needle through head at an angle, pull up on thread and clip next to fabric to bury ends.
Mouth. Mark corners with large head straight pins. I usually use pink or rose sewing thread for this. Thread a double strand into embroidery needle. Insert needle next to 1 pin (point 1), go through head and exit next to second pin (point 2). Go over the top of the fabric, reinsert needle next to first pin, go through head, and exit at second pin. Remove pins. Pull thread to slightly indent a mouth. Go over the top of the fabric, reinsert needle next to point 1, exit at point 2, pull up on thread. Skip over a tiny stitch; reinsert needle at point 2, exit at point 1. Tie beginning and ending tails together, then work each one separately through head to hide the ends.
Nose. Embroider 2 french knots with MC, or knit a nose, as follows. Automatic CO 5 sts. K 6 rows. Clip yarn, thread into tapestry needle, and take sts off on yarn tail. Pull up beginning and ending yarn tails to gather a small ball. Knot ends, then work yarn tails into ball for a tiny bit of filling. Sew nose in correct position with MC yarn.
Hair. The simplest “do” is to just make a 2″ pompom from desired color of yarn and hot glue to top of head. Braids may be made by wrapping yarn around a 12″ ruler. Tie firmly in the middle, and cut other end. Be generous. It takes quite a few wraps to make a good braid. Hot glue to top of head, arranging yarn to cover head. Make a small pompom for bangs if desired.
Another fairly easy hairdo is to hot glue purchased curly hair from the craft department.
NOTE: If this doll will be used as a toddler’s toy, DO NOT use hot glue for anything. Toddlers put everything in their mouths. The safest course is to embroider all of the facial features and securely sew on the hair. Beads and wiggle eyes are best used for toys for older children, or decorative purposes only.
Dress
Crochet CO 40sts. K even to RC 24. Divide work; place 20 sts left of center 0 into hold position and knit on right side only. K even to RC 32. Transfer every other stitch to adjacent needle. K 1 row. Clip yarn. Cut two strands of matching yarn, approximately 12″ long, and thread tapestry needle. Remove remaining 10 sts on doubled yarn. Do not fasten off yet. Work left side to correspond and remove on doubled yarn. Block lightly. Sew seam. Place on doll. Tie yarn into a bow on each shoulder, then trim ends. This will be more secure if a square knot is first tied, then make the bow. Allow bottom edge to roll.
Pants
Make exactly as for dress, above. After placing on doll, tack together between legs with matching yarn, stitching through the roll at bottom edge.
Original pattern was uploaded to Clearwater Knits website and copyrighted in 1997
