Casting On and Knitting Stockinet
Before beginning this section, you should have completed the Preparing to Knit section. Carriage should be on the left side, and every other needle selected from 30L – 30R in pos B. You should also have threaded the Auto Tension.

Couple two sections of the cast on comb with the comb connector.
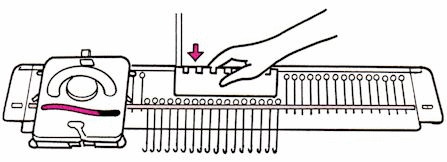
Arranging Needles
Using the straight side of the needle pusher, bring 60 needles, from 30L-30R, all the way forward. Now use the 1×1 toothed side of the needle pusher, and return every other needle to position A, out of work.
Set the carriage so that both Side Levers are back to the triangle positions, and both Russel Levers are forward on ll. Do not thread the carriage yer.
Start with the carriage on the left side of the needle bed. Move it to the right until it passes needle 30R, then return it to the left side. The 60 selected needles are now in position B.
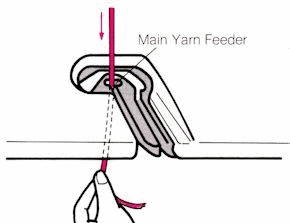
Place yarn in the main yarn feeder, slot #1. The illustration shows the left hand holding the yarn end. This works, but you might prefer to fasten a spring-type clothes pin on the end instead; it will hold the yarn end down out of the way, and free your hands for other tasks. Other clamps and clips that are strong enough to hold the yarn tail down may also be used.
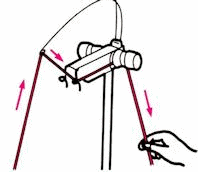
Eliminate slack yarn by pulling down on the yarn below the Tension Dial. Many people also find it helpful to pull up on the yarn just above the yarn feeder slot on the carriage to eliminate any extra that might have worked its way under the carriage. Be careful on this first row, since it is easy to pull the yarn completely back out of the carriage.

Knit 1 row from left to right. This is what the needles and needle bed should look like; the yarn is hooked in each needle in B position, and the needles in A did not knit.

Carefully fit the teeth of the cast on comb over the loops just formed by the row of knitting.

On the left end, bring the yarn end under the cast on comb; lift it up and wrap it over the top and back down through the yarn clip. (It looks like a little hook on the end piece of the cast on comb.) Free the yarn that is trapped under the teeth of the comb on the right side, but be careful not to pull the yarn out of the needles. Note: the yarn should go under just one tooth of the comb past the last working needle.

Using the straight side of the needle pusher, return the alternate needles that were pushed back to pos A into pos B. 60 needles again in pos B. This completes the basic cast on.
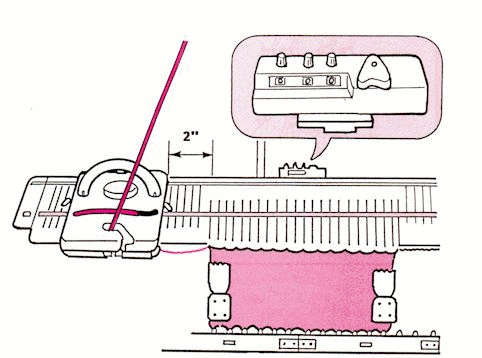
As soon as the cast on is completed, set the row counter to 000. Knobs may be turned either direction. Begin to knit. Move the carriage at an even speed. Many people are afraid that they will damage the machine and do not push hard enough at the beginning. Expect to find some resistance. This will get better fast as you learn the feel of the carriage. Take the carriage the width of 5 or 6 needles (approximately 2″) past the last needle in position B before changing directions. If you turn around in the middle of the row, the stitches will drop and the carriage may jam. If you go too far past the last needle, there may be loops and tangles on the edges.
Try to push the carriage across the entire row in one smooth pass. Beginners frequently push a short way and stop, push again a short way, and stop, etc. This jerky motion can cause dropped stitches, and in extreme cases may even damage the needles; because, without realizing it, you tend to back the carriage up before beginning to knit again. Do not back up in the middle of a row. If your carriage jams, release it following the instructions in the Preparing to Knit section.
After 3 or 4 rows, hang the claw weights on the fabric edges. Claw weights should be moved up every 20 – 30 rows. Now continue to knit. The object is to become familiar with the feel of the carriage, learning how to keep a nice, even speed, learning how far to move the carriage, and how to manage the weights. Repeat the cast on and knitting process several times, until it becomes comfortable. Hooray! You are knitting stockinet, the most widely used knitting stitch.
Stripes
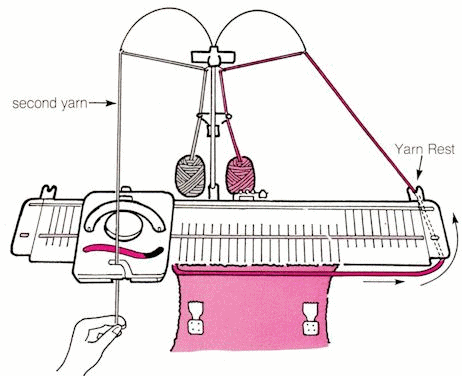
When you have completed threading the tension unit, place the yarn in the yarn clip. Thin or slippery yarn may need to be wound two or three times around the yarn clip.
Thread contrasting yarn through the left side of the Auto Tension unit and into the main yarn feeder on the carriage. Knit a few rows. Now remove the second yarn, pass it behind the left end of the machine and into the yarn rest on the left rear of the needle bed. Remove the first yarn from the right yarn rest, bring it back to the front, and slide it into the main yarn feeder. Pull up on the yarn to remove the slack, then knit a few rows.
Continue in this manner, exchanging yarn and placing the discontinued one into the appropriate yarn rest. Patterns will usually say how many rows per color are in each stripe. Actually, it is possible to change yarns with the carriage on either side of the bed, even though this is not shown. Always rest the yarn which comes through the right antenna in the yarn rest on the right rear of the needle bed, and the yarn from the left antenna in the yarn rest on the left rear of the bed. This will keep them from tangling as the carriage passes over the working needles.
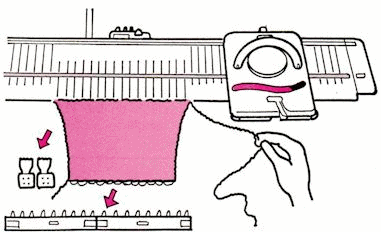
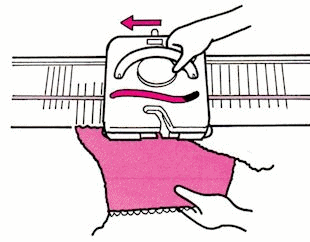
We will now remove the fabric on waste yarn. Waste yarn is a few rows of contrasting color. It is not part of the completed garment, but is removed during finishing. It acts like a stitch holder, allowing live (not-bound-off stitches) to be removed from the machine without worrying that they will ravel. After completing the fabric section, clip the main yarn, leaving a 6″ tail. If you clip above the carriage, this will be about right. Pull the yarn free of the carriage, and fasten a clothes pin on the end to hold it down. Thread the second yarn into the carriage, knit 8 rows and clip. Remove the cast on comb and weights.
Take the carriage across empty, and the fabric will just fall off.
Remember this for the future; any time the yarn comes out of the yarn feeder while the carriage is moving, the fabric will fall off the machine. The LK 150 yarn feeder sometimes has a little quirk. A casual glance from the top indicates that yarn is in the feeder properly; however, it is possible for it to come out of the slot at the bottom. When the carriage is taken across, everything falls off. I find this happens most when the tension on the yarn has become slack. This extra yarn works its way back under the carriage and lets the yarn in the feeder make a small loop, which then slides out the bottom. It is a good practice to pull up on the yarn before knitting if the carriage has been sitting idle for a few minutes, or if you have gone too far past the last working needle.
This completes the basic instructions for casting on and knitting stockinet. There are many ways to cast on. We will learn some of them in future lessons. For now, please practice this one until you can comfortably cast on, knit evenly without dropping stitches or getting loops on the edge. Change colors, and (purposely!) drop the fabric off the machine.
This tutorial was copyrighted and uploaded to the original Clearwater Knits website in 1997. It was updated in 2017.
