Decreases
There are many ways to decrease on a knitting machine. These are the most common ones, and will allow you knit most beginner and easy machine knitting patterns.
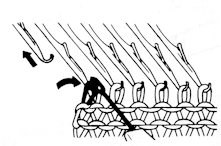
Simple Decrease
This is the easiest decrease. It is worked right on the edge, and can be made on both edges at the same time. Remove the edge stitch with the transfer tool, and move it onto the second needle from the edge. Continue to knit. One stitch has been decreased.
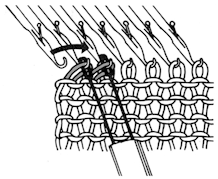
Fully Fashioned Decrease
This decrease method can be worked on both edges at the same time. Using the 2-prong transfer tool, remove 2 stitches on the edge. Move them over 1 needle and rehang the stitches into the hooks of needles 2 and 3.
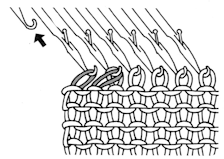
Needle 3 now has 2 stitches on it, and needle 1 is empty. Take needle 1 back to position A, out of work. The decrease is actually made on the second stitch inwards from the edge.
Fashion decreases may be made farther inwards from the edge, for a decorative effect, if desired. Try using the 3-prong tool. You can also move larger number of stitches inwards, using a 7-stitch transfer tool available from dealers or online merchants, or make multiple moves with the 2- or 3-prong tool.
Multiple Decreases
This decrease method can be worked from left to right, as shown, or from right to left; but it must be worked on the edge nearest the carriage. You may find it easier to unthread the carriage before beginning the decreases. We will decrease 3 stitches. You can actually work this decrease on any number of stitches desired, including every stitch in the row. This is often called a transfer tool bind off. You frequently use this decrease method at the beginning of the armhole, when more than one stitch needs to be eliminated at the start of the shaping sequence.
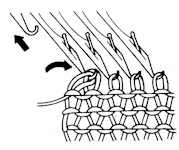
Step 1
Move the stitch from needle 1 to needle 2 with the transfer tool, and take needle 1 back to position A, out of work.
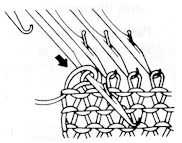
Step 2
Bring needle 2 forward so that both loops of yarn go back behind the latch.
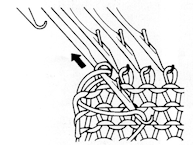
Step 3
Take the yarn strand into the hook of needle 2.
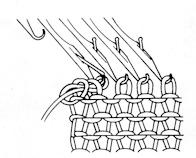
Step 4
Push needle back so that the yarn strand goes through both yarn loops. This creates a new single stitch on needle 2.
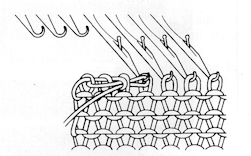
Step 5
Move the stitch from needle 2 to needle 3; bring the needle forward so that both loops go behind the latch. Place the strand of yarn into the hook of needle 3, push the needle back to form a new stitch. Move the stitch from needle 3 to needle 4.
Be sure needles 1-3 are all the way back, out of work. I usually pull needle 4 forward so that both loops go behind the latch; it just makes it easier for the machine to knit. Rethread the carriage and continue to knit. Three stitches have been decreased. You may find it helps to place a weight on the edge to help hold down the bound off area.
Alternate Decrease Methods
The following methods vary slightly from the ones above. Many people feel that the extra step involved in each produces a slightly better-looking end result.
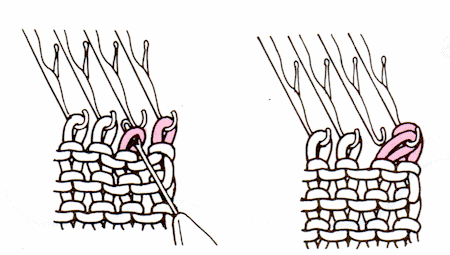
Simple Decrease, Method 2
This is very similar to the Simple Decrease, above. Using a single-prong transfer tool, move the second stitch to the edge stitch.
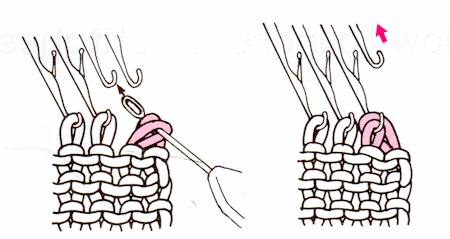
Move both stitches from the end needle back to the second one from the edge, then take the edge needle back to position A, out of work.

Multiple Decrease, Method 2
Step 1
This decrease must be worked on the side next to the carriage. You may find it easier to unthread the carriage first. Begin it the same as for the Simple Decrease, Method 2, above. Using a single-prong transfer tool, move the second stitch to the end needle, then move both stitches back to the second needle and return the end needle to position A.
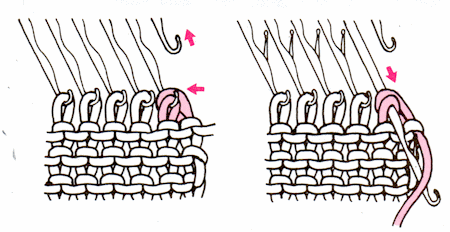
Step 2
Bring needle forward so that both loops of yarn go back behind the latch. Take the yarn strand into the hook.
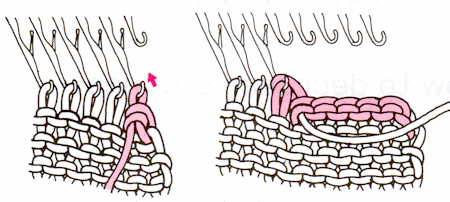
Step 3
Push needle back so that the yarn strand goes through both yarn loops. This creates a new single stitch on end needle.
Repeat steps 1-3 until required number of stitches have been decreased. Be sure the decreased (empty) needles are all the way back, out of work. I usually pull the end needle forward so that both loops go behind the latch; it just makes it easier for the machine to knit. Rethread the carriage and continue to knit. You may find it helps to place a weight on the edge to help hold down the bound off area.
This tutorial was copyrighted and uploaded to the original Clearwater Knits website in 1997. It was updated in 2017.
