Easy Camisole

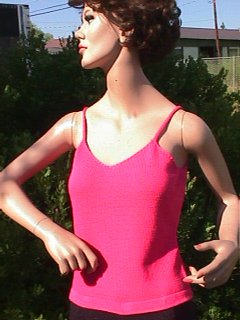
Absolutely the fastest camisole you’ll find. Double decreases along the top points form a neat braided edge, and no other finishing is necessary. Sew up the side seams, work in the yarn ends and that’s all there is to it. Shown in Bonita cotton for hot summer weather, this style works equally well in a glitzy dress yarn under a jacket for special occasions. Be sure to add this pattern to your collection!
Made on any standard gauge knitter. There is no automatic patterning or ribbing, so this is suitable for even the most basic standard gauge machine. Photo shown is size M. Mannequin has a 34″ bust.
Sizes: S-M-L
Body Bust: 32 – 34 – 36″
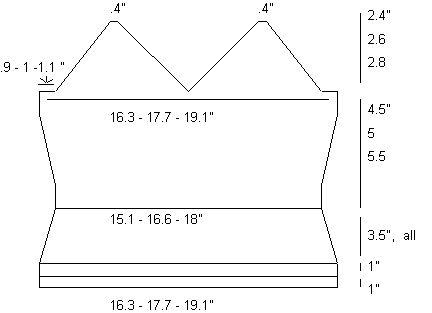
Garment Width at Bust: 32.5 – 35.3 – 38″
Garment Length 13.6 – 14.3 – 15″
Materials Required: Bonita cotton by Knitcraft, approximately 5-6 oz
Machine: Knitking 881 standard gauge machine, but any standard gauge machine may be used. No ribber required.
Tension: 8 1/3 on Knitking or Brother. Studio/Singer machines will probably have to go up 1 full number, so measure swatch carefully and increase stitch dial number as needed. Garment will shrink at least 1″ lengthwise in first laundering.
Gauge: 7 sts, 10 rows = 1 inch
Back
Begin at lower edge. T 7. CO 114 (124-134) sts with WY and ravel cord, ending with COR. Change to MC. RC 000. K even to RC 10. T 9. K 1 R. T 7. K even to RC 21, ending with COL. Hang hem from first row of MC. T 9, K 1 row to R to seal hem. T 8 1/3. K even to RC 36, all sizes. Dec 1 st both sides on this and every following 8th row a total of 4x. 106 (116-126) sts remain. K even to RC 78 (82-88). Inc 1 st both sides on this and every following 12th row a total of 4x. 114 (124-134) sts again in work. K even to RC 126 (130-136).
Each point is worked separately. To avoid marking the fabric remove entire section on WY. Rehang first 57 (62-67) sts (right half of Back). COR. RC 000. BO first 6 (7-8) sts. Now before knitting any rows begin fully fashioned decreases. Both sides of point are shaped the same. *With the 3-prong transfer tool, move 3 edge sts inwards 2 needles. First needle on each edge will have 1 st on it, needles 2 and 3 from each edge will have 2 sts on them. K 2 rows. Repeat from * until 7 sts remain on RC 22 (24-26). Dec just 1 st each edge this time, moving the 2nd st to the 3rd needle, then moving the end needle in. BO remaining 5 sts. Take carriage across to R, rehang sts for L point and knit to correspond.


NOTE: There is a technique that will help prevent the little separation at the center front where the points divide. When rehanging for the second (L) point, insert the latch tool between the first and second sts next to center front on the first (R) point, catch the first stitch held by WY and pull it through the fabric, then hang this stitch on the first needle L of center 0. Pick up the rest of the sts and proceed exactly as instructed above. Beginners may find this difficult, but it really improves the look of the V.

Front
Knit exactly as for Back, except do not bind off the 5 remaining sts at top of point. Instead, set carriage to knit a cord (slip 1 direction, knit the other). Knit approximately 8″ and remove from machine. The free end of the cord will be sewn to the corresponding point on the back after side seams are sewn. It is a good idea to wash and dry the completed garment, try it on, then adjust the length of the cord before sewing it to the back.
For a slightly different look, knit cords on both back and front points, 10-12″ long, and tie on top of shoulders.
Original pattern was uploaded to the Clearwater Knits site and copyrighted in 2000.
