Working With Stitch Patterns
One of the most exciting experiences when learning to use a knitting machine is creating pattern stitches. Items such as hats or scarves, and even simple garments become designer quality when knitted in pattern. For best results, you should be comfortable using your knitting machine, and be able to cast on, knit evenly in stockinet without problems (such as dropped stitches or loops forming on the edge.) You should also understand tension, and how the stitch dial controls the size of the stitches and the ability of the carriage to easily knit across a row.
Many new machine knitters are so eager to start knitting that they skip over or rush through learning all the parts of the machine. Since many new parts will be used when knitting pattern stitches, please take time to become familiar with these.

The Needle Bed
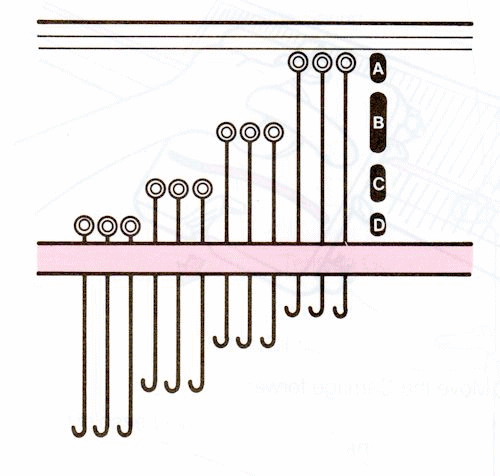
There really isn’t much to learn about the needle bed. On both ends there are the letters A, B, C, and D. These are the needle positions.
Needles in position A never knit, no matter how the carriage is set. This is often called Out of Work position.
Position B is the most commonly used. Needles in B position will knit stockinet and most pattern stitches.
Position C is sometimes called Upper Working Position. It is most often used when returning stitches that have been in holding position back into working position.
Position D is often called Hold(ing) Position, and needles placed there are said to be “in hold.” When the Russel levers on the carriage (the front levers) are pushed back to l, needles in position D will not knit. This is the setting used for short rowing, also called partial knitting. It is also the setting used to create tuck stitch patterns.

The Carriage
The levers on the carriage are very important. The way they are set controls stitch patterning.
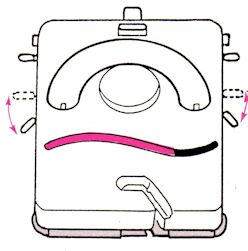
Russel Levers. On an LK 150, the Russel levers, are the ones used most; they are located on the sides, toward the front of the carriage. Normal position for knitting is forward, on ll. When the levers are set here, stitches in positions B, C, and D will knit, and the needles will return to position B as the carriage passes across.
When the Russel levers are pushed backwards to l, the needles in position D will not knit; the yarn simply passes over the top of the needle as the carriage goes over them. This is used for short row shaping, and also to create tuck stitch patterns.

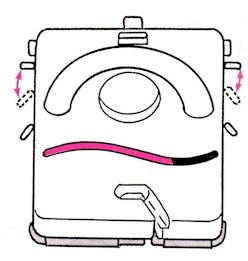
Side Levers. These are located on the sides of the carriage, near the back. The normal position for these levers is back, on the ▲ (triangle.) This is where the levers should be set all the time, except when knitting slip stitch and Fairisle patterns.
When the Side levers are forward on the ● (dot), needles in position B do not knit; instead, the yarn passed underneath them as the carriage goes across. Bring the Side levers forward to the ● (dot) when creating slip stitch or fairisle (which is actually a multi-color variation of slip stitch.)
Except when knitting in pattern, or intentionally placing needles into hold (Position D on the needle bed,) always keep the back levers (the Side Levers) pushed backwards, and the Russel Levers (the front levers), pulled forward. It is easier to remember if you use this little hint…”back levers backwards; front levers forward”. If you ever have problems when knitting, such as stitches dropping, or you get a tangled mess when the carriage goes across, check the position of the levers. It is easy to bump one out of the correct position, and it can cause all kinds of problems.
Most pattern knitting requires using weights. Tuck stitch, especially, needs extra weight to help keep the stranding yarn in place on the needles, and to help these strands knit off successfully on the stockinet pattern rows. On the days that static electricity is bad, you can actually see these strands of yarn trying to push away from each other, and without enough weight, the stitches sometimes jump right off the needles.
Static is worse when the air is dry, and running a humidifier in the knitting area helps. Some people like to spray Static Guard, or another anti-static spray that is made for clothing, on the yarn. Wiping the needle bed, underside of the carriage and the metal antennas with a dryer anit-static sheet, such as Bounce, also seems to help.
Weights are essential for successful knitting, and if at all possible, get extras. Any Silver Reed dealer can provide them, and you can usually find them online as well.
Reading the Stitch Chart
The final thing we will cover in this introduction is how to read a pattern chart. The ones in the LK 150 manual are a little different from the ones found in most knitting patterns, because they have the instructions for setting the carriage included in the chart itself
The instructions in the manual are a little confusing for many people, so we will go over these here.

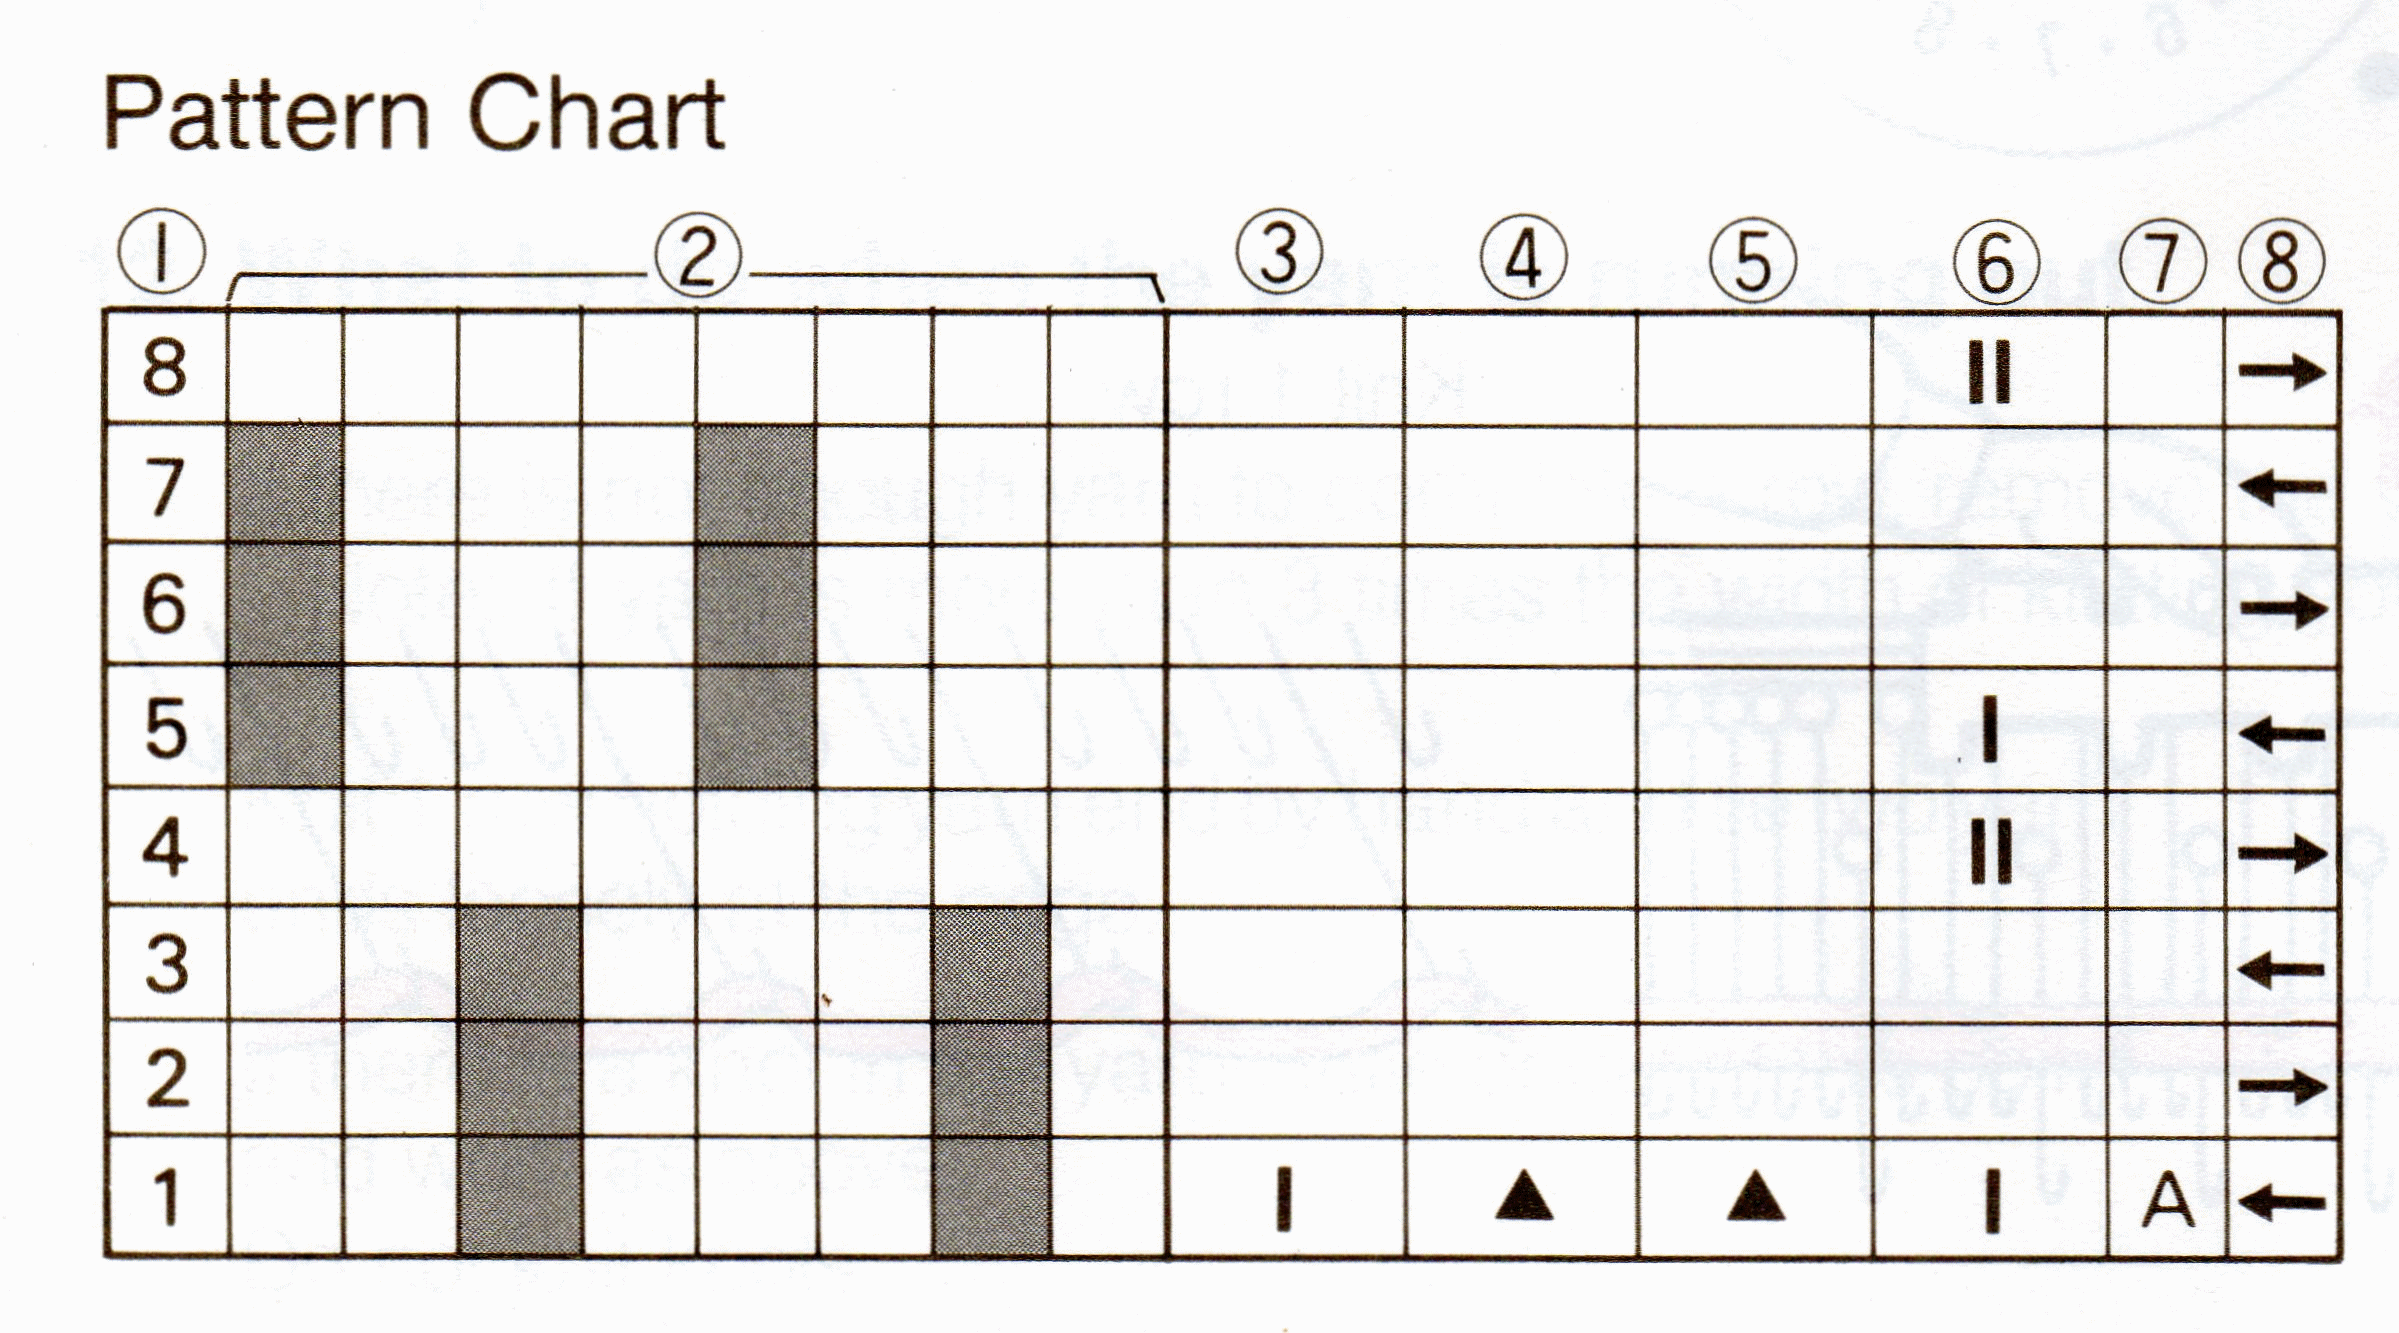
The chart is divided into two sections. The left section is the actual stitch pattern chart, and the right side contains the information on carriage settings, yarn color, and the direction the carriage should move each row. This is a tuck stitch chart.
Look at the top of the chart. Number 1, at the left side, shows the row number. We always read a chart from bottom to top, and that is why the numbers begin with 1 at the bottom of the column.
All of the columns under number 2 at the top are the actual stitch chart.It is an 8-stitch and 8-row pattern repeat. Stitch charts always have a legend that explains what the symbols mean. in this case, the gray boxes mean that needle is in position D, and the white boxes mean that stitch is in position B.
Under column 3, at the bottom, we see that the left Russel Lever should be pushed backwards to l. There are no other entries in that column, so that Russel Lever will remain in that position throughout.
At the bottom of columns 4 and 5, we see that the Side Levers should be backwards on the triangles. There are no other entries on either column, so the Side Levers will remain in that position throughout.
Column 6 is probably the most confusing. This column is for the right Russel Lever. Starting from the bottom, we see that the Russel lever should be set backwards to l; we then knit this row, then 2 more, with the lever on position l. On row 4 (as indicated by the leftmost column on the chart,) bring the right Russel Lever forward to ll and knit just one row. Return the right Russel Lever to the backwards position, l, and knit three rows (rows 5, 6, and 7) as shown on the chart. On row 8, the last row of the repeat, bring the Russel Lever forward and knit one row. This completes one vertical repeat. You should now return to row 1, at the bottom of the chart, and repeat rows 1-8, following the written instructions for your garment.
Column 7 is for the yarn color. Since there is only one entry, on row 1, we know that we should knit this in one color throughout.
Column 8 indicates the direction the carriage should travel each row. The arrow in row 1 is pointing toward the left. This means the carriage begins on the right side, and the first row it goes from right to left. The arrows now alternate, going up the column, so we know that we should continue to push the carriage back and forth, as we normally do for stockinet.
This completes the introduction to pattern knitting. Most of it is fairly easy to understand, but we covered a lot of information, especially the lever settings on the carriage, and how to read an LK 150 chart. If you get lost when trying to work a stitch pattern from the manual, come back to this page and re-read the instructions.
There are several software programs for creating stitch charts, and most of them don’t make charts that look like the ones in the LK 150 manual. The legends will tell you what the symbols mean, and you will be able to use them. But it would be better to work your way through the stitches in the LK 150 manual first, and become thoroughly familiar with how your machine creates these stitch patterns. Then you will be able to use other designers’ patterns with confidence.
This tutorial was copyrighted and uploaded to the original Clearwater Knits website in 1997. This page was added to the LK 150 Tutorial on December 16, 2016
