Japanese Charting Lesson 1
General Information
Charting was the first method machine knitters used to draft their patterns. It was popular nearly 40 years before home computers and pattern software were available. This is still a very good method for creating patterns, and even if you do not plan to make your own, it helps to understand how these charts are created.


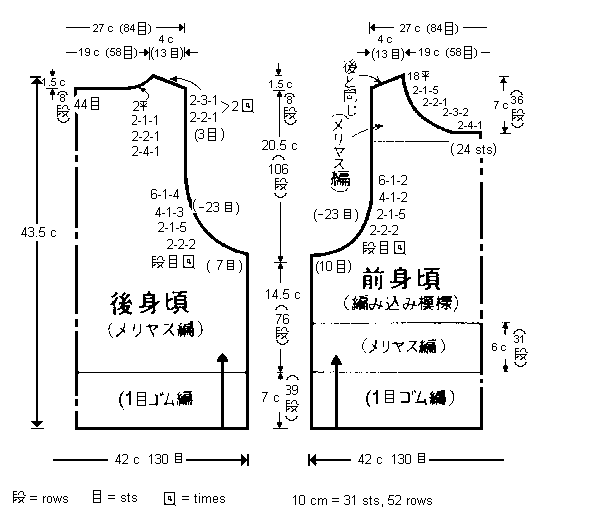
Oh, My!! You mean I’m supposed to be able to knit a garment, just from something like that?? Yes, indeed. When we finish this tutorial, you will understand enough about Japanese charts to make a sweater, using only a chart, similar to the one on the left.
We will, however, be working in English. You absolutely do not have to learn Japanese.
We are going to begin by learning to read the chart. It is necessary to understand a few (very few!) symbols and how a chart is constructed. And after we learn to knit from a Japanese pattern, we are going to learn to make patterns, using the same methods, in English.
Japanese charted patterns differ considerably from Western ones with which we are more familiar. There are almost no instructions for the techniques used in garment construction. Written patterns of any kind are not commonly used. A person is supposed to be able to knit a garment just by looking at a picture and chart of it.
We don’t need to be able to read Japanese to use this method. There are really only a few symbols used, and these are easy to learn.
Japanese patterns are more standardized than the written patterns used in the Western world, but there are still a few differences in the way they are written. The major difference is the shaping formula. Most patterns printed in Japan use the rows-stitches-times shaping formula. I recently went through my stash of more than a hundred old Japanese books and magazines and nearly all of them use the rows-stitches-times formula. These patterns are all from the ’70s and ’80s, and that may have changed in their modern publications, but I’m guessing it hasn’t.
Interestingly, though, Studio’s Silver Knitting Book, also written in Japan, uses the stitches-rows-times formula. It was created much earlier; my first copy was published in 1963 (I literally used that one until it fell apart.) My second copy was printed in 1964, and still has the same shaping formula of stitches-rows-times. Most American pattern writers of that era use this formula in their pattern charts, and it can cause great confusion and frustration unless you know that there are two charting formula systems, and which one the designer is using.
If the pattern formula is rows-stitches-times, and the notation is 4-2-5, this means every 4 rows increase/decrease 2 stitches 5 times. If the pattern formula is stitches-rows-times, and the notation is 4-2-5, this means increase/decrease 4 stitches every 2 rows 5 times. As you can see, these two methods produce extremely different results, so you absolutely must know which shaping formula the pattern uses!
Gauge in Japanese charted patterns is always given in stitches and rows per 10 cm, rather than stitches and rows per inch. This may be confusing to knitters in the USA, but really isn’t as bad as it seems. 10 cm is nearly the same as 4″. Usually dividing by 4 will give you a usable gauge. Fine yarns may need a stitch or two more in the garment width to compensate for the slight difference; unless the gauge is 8 sts per inch or finer, I don’t bother to do this. Two extra stitches at each side seam will be plenty, even on larger sizes.
One of the most helpful pieces of equipment is a tape measure that gives inches and centimeters, preferably on the same side. Also, if you don’t mind a little math, 2.54 cm equal 1 inch; therefore, divide cms by 2.54 to convert into inch measurements. A calculator is invaluable for this.
Gauge will be found in the written text at the top of the page. Sometimes the lines of text go back and forth horizontally, like Western writing, and sometimes they go up and down, beginning at the top right edge, and proceed from right to left. The gauge is usually buried in the text, so it may be necessary to really look for it. This is the symbol for it:
Most of the other writing covers only the same kind of information that is usually found at the top of our written patterns, and includes type of yarn, how many ounces, what colors are used, finished measurements of the garment, and tension settings. Usually only one size is given. It up to the knitter to rechart a size that fits. Arrows on the chart indicate knitting direction, and there may be a few very brief instructions, such as: “Sweater, K with 2 strands. 1 x 1 Rib, K single strand. Purl side is the right side.” However, actual knitting instructions are not included.
Japanese Pattern Charts
Introduction to charted patterns.
Japanese Charting Lesson 1
General information and preparing to draft knitting patterns using the Japanese method.
Japanese Charting Lesson 2
What does all of this mean? Interpreting Japanese symbols and drafting formulas.
Dolman Pullover Chart
What a charted version of the Ladies Dolman Pullover looks like
Men’s Tuck Stitch Pullover Chart
What a charted version of the Mens Tuck Stitch Pullover looks like
Original version of this tutorial was copyrighted and uploaded to the old Clearwater Knits website in 1998.
