KR10 and KR11 Knit Contours
You will need to know both the stitch and row gauge in order to use the Knit Contour unit. Make a swatch to determine stitches and rows per 10 cm, exactly as instructed in Making A Gauge Swatch and Measuring Gauge
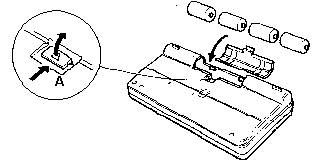
This Knit Contour is battery powered; it will not operate without them. Turn the KR-10 upside down and remove the battery lid; push lock “A” away from the unit and lift off. Insert 4 “C” batteries. Be sure the + sign of each battery is turned the correct way. This is marked inside the case. Replace the lid and snap securely into place.

Connecting The KR 10/11 Knit Contour To The Knitting Machine
Connect one end of the cord to the KR-10, and the other to the knitter or row counter. Please note that if you are connecting it to the LK-150, you must use a special row counter with a plug-in port. (You may have to purchase it separately.) The Knit Contour connects to the row counter, rather than directly to the knitter.
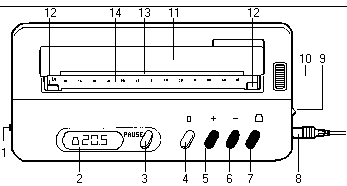
Illustration of Parts of the KR 10/11 Knit Contour
1. Select Lever. Set it to 1/2 or 1/4 scale, depending on pattern.
2. Display. 00 indicates row gauge. It is used while setting row gauge, and is the setting shown in illustration. 0 is the row counter setting. It is used while knitting the garment, and covers 1 to 999 rows. X indicates batteries are worn out and must be changed.
3. Pause Key. Push to lock pattern feeding (number in display disappears.) Push again to unlock (Number in display reappears.)
4. Reset Key. Resets row number to 0
5. Plus Key. This is used to:
a. Set row gauge. Every time key is pushed, the number increases by 0.5.
b. Move the pattern forward.
6. Minus Key. This is used to
a. Set row gauge. Every time key is pushed, the number decreases by 0.5.
b. Move pattern backwards.
7. Set Key. Used to set and memorize number of rows required.
8. Connecting Cord. Connects Knit Contour to machine.
9. ON/OFF Switch. Display shows “0” when it is on.
10. Feeding Dial. Moves pattern forwards and backwards manually.
11. Paper Stand. Holds pattern up away from case.
12. Clip. Holds Stitch Scale in position.
13. Pattern Slot. Insert pattern here.
14. Stitch Scale.
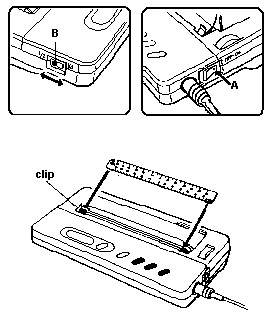
Setting Up The KR 10/11 Knit Contour
1. Set ON/OFF Switch (A) to OFF.
2. Set Select Lever (B) to 1/2 when using half scale patterns, 1/4 when using quarter scale patterns. We will assume that 1/2 scale patterns are
3. Set ON/OFF Switch to ON. Display now shows 0.
4. Use the h4-h14 Stitch Scale set. Select the one which corresponds to the stitch gauge from your swatch. Insert it with the correct side facing up into the clips, pushing down firmly to be sure it is straight.
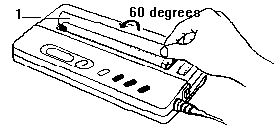
Raise pattern stand to an angle of approximately 60 degrees.
The electronic KR 10/11 Knit Contour patterns are different from the patterns supplied with the KR6 and KR 7 mechanical units. There is an envelope containing four different patterns, including half scale
Lady’s Pullover, body bust sizes 32 1/2 to 39″
Lady’s Cardigan, body bust sizes 32 1/2 to 39″
Child’s Cardigan, chest sizes 20.5, 22, and 23 5/8″
And a quarter scale pattern for a Man’s Raglan Pullover, chest sizes 36 1/4 to 44″.
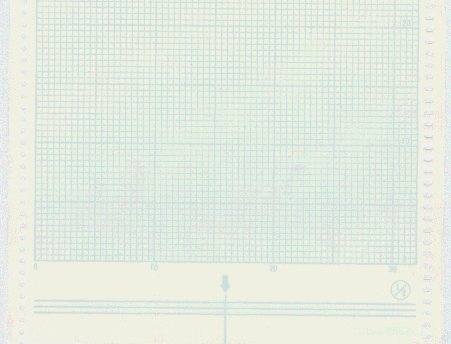
All of these patterns are printed on paper. This is confusing to many people, because the paper patterns cannot go into the Knit Contour. Instead, they must be copied onto the mylar sheets which are included with a new KR 10/KR11 unit. There are mylar sheets for both quarter and half scale patterns included. The illustration at the left is just a small section of the bottom of the half scale sheet. The sheet is printed with a green grid to make it easier to trace or copy the desired pattern. The section at the bottom of the sheet has three parallel lines to aid in inserting the sheet correctly into the Knit Contour Unit. (Be sure to always insert the edge with the arrow into the Knit Contour.)
The quarter scale mylar is very similar. It has a darker center line, with “0” under it, and the numbers go from 10 to 30 outwards to the left and right edges. It is interesting that the size of the actual squares on the grid are exactly the same. The heavy division lines are twice as far apart on the half scale mylars, but the squares are the same.
Another way you can get the pattern onto a mylar sheet without tracing is to tape a paper pattern onto the mylar. I’m sure this method is not recommended by the manufacturer, so will not be held liable if you run into difficulties when using it. I only use this technique on patterns I have drawn on paper myself, not the commercial ones that come with the Knit Contour, because the tape doesn’t come off the paper and I don’t want to ruin the commercial patterns. Light to medium weight paper works best (16-20 pound copier or general purpose office paper). It will be necessary to trim the paper pattern so that it fits between the vertical rows of holes on the outside edges.
Place the paper pattern over the mylar, again matching the center lines of the paper pattern with the marked center line on the mylar sheet. Use cellophane tape. Tape the entire top and bottom edges of the paper to the mylar, then the side edges. I usually use short lengths of tape because they are easier for me to control. The main thing is to be sure the paper is securely attached to the mylar, with no wrinkles or bumps. It has to feed through the Knit Contour smoothly. Also be sure that the tape does not cover any of the holes on the side edges. If you have attached the paper correctly the sheet will feed through normally.
You may purchase any of the Knit Contour patterns available from your Studio dealer, since you must copy the outline onto the mylar screen, anyway. If you purchase patterns designed for the KR-7, place the left side of the mylar screen over the centerline of the paper pattern, and copy off just the right half of the garment onto the screen. Some of the patterns available as extra sets are not symmetrical (the right side is different from the left.) These are better left until you gain experience working with the Knit Contour. When you feel confident enough to try them, both sides must be marked on the paper. The centerline of the KR-7 paper will still be the left side of the mylar screen, but both sides of the pattern must be drawn to the right of the mylar center 0 line at the left side. It is a very good idea to draw a small sketch of the garment piece on a separate sheet of paper and refer to it often while knitting. You may find it helpful to make notes on this paper as you knit, including the row count number for the start of each shaping area, sts to cast on, bind off, increase, and decrease.
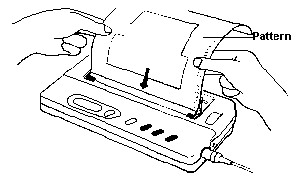
Insert pattern into pattern slot, which is located between the stitch scale and pattern stand. Insert with arrow down. Please note that there are holes along each edge. These must exactly match with the teeth on two black wheels, located inside the case on each side of the slot. If pattern is not straight, the teeth on these wheels will damage the edges.
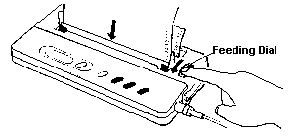
Turn Feeding Dial slowly towards you, checking that the horizontal lines on the pattern are parallel to the stitch scale. If they are not parallel, push firmly down on the stitch scale to be sure it is completely down behind the clips and that it is straight. Also again check that the holes on each side are meshed correctly with the teeth on the black wheels inside the case. It sometimes happens that the hole on one side is caught on a lower tooth than the hole on the other side, and the pattern feeds through at an angle. If this should be the case, carefully turn the Feeding Dial away from you to release the pattern. Reinsert it and begin again.
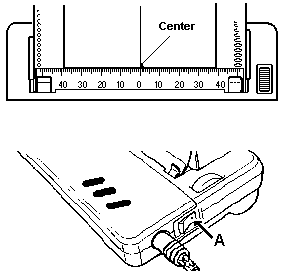
When you are sure pattern is inserted correctly, turn Feeding Dial slowly until the horizontal line on the pattern is exactly at the top edge of the Stitch Scale. Move the Scale until the left vertical line on the pattern is in line with “0” on the Scale. The illustration shows a quarter scale pattern, which has a centerline; this must be matched to “0”, which is in the center of the Scale. Again, shift the Scale as necessary to match up with centerline on pattern.
To memorize row gauge, turn switch “A” OFF. This clears the memory, and all previous settings are cancelled. Turn switch back ON. Display shows 0.

Press Set Key (A) once. Display shows “00.”

Press Plus Key once. Display shows “10.0” Press Plus Key (A) until you reach the row gauge, determined from your tension swatch. If you go too far, you can back up to the required number by pressing the minus key (B)

Press Set Key (A) once. Display now shows “0”, and row gauge has been memorized. The function now changes to that of row counter. To change the row gauge, switch the unit off and reprogram, following steps above. From this point on, do not move the pattern with the Feeding Dial; use only the Plus or Minus Keys.
To begin a garment section with scrap yarn, press the Pause Key to lock both the row counter and feeding action of the Knit Contour unit. “0” disappears in the display. Knit the scrap yarn section. Press the Pause Key again. “0” appears again in the display.
The KR-10 has one more function that is helpful for many patterns. The unit can be set to return to a marked position automatically. This is especially helpful when knitting the neck. Any position can be programmed by pressing the Set Key and Minus Key at the same time. Continue to knit the first shoulder as usual. Press the Minus Key; pattern will return to base of neck automatically, and stop. If pattern did not stop in the right place (sometimes it may be off a row or two) adjust with the Feeding Dial.
Go on to How To Read Knit Contour Patterns and follow instructions for reading the Knit Contour pattern. Only the physical operation of the KR-10 differs from that of the KR-6 and KR-7. Reading the pattern is exactly the same.
If you like to work in smaller scale, you will find that the quarter scale setting is great! You may use all of the pattern drafting instructions given previously. I suggest that you make a quarter scale ruler, the same way we made a half scale one, rather than trying to work with a “regular” one. If you don’t want to bother with that, try drafting directly on graph paper which is marked in 1/4″ squares. Each square equals 1″, and even large adult garments can easily fit on a page.
Please note: this book was written in 1988. Paper patterns and mylar sheets are no longer available new, unless your dealer has some stock that has been in storage. These are getting hard to find, but they sometimes come up on eBay or estate sales.
This tutorial is from the book, Making Friends With the Knit Contour by Irene Woods, published in 1988, and uploaded to the original Clearwater Knits Website in 1998.
