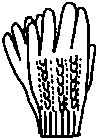
Ladies Gloves

One Size Fits Most
Finger length varies. It is best to knit to the length needed by the person, since even two or three rows too long, or too short, can be uncomfortable. It is easier to take out a row or two than it is to rehang on the machine and knit more length, so when in doubt, knit the fingers a few rows longer than the expected length, then adjust as needed when sewing up.
Materials Required: approximately 4 oz sport weight or double knitting wool yarn which will knit to the required gauge. Note: This yarn normally knits to 6 stitches per inch/24 sts per 10 cm; gloves need to be knitted at a tighter tension, and this should be a fairly firm fabric.
Gauge: 7 sts, 9 rows = 1 inch
Tension: approximately 9
CO 60 sts in K1, P1 ribbing. T 7/7, K even to RC 20. Change to Stockinette. T 9. K even to RC 44. Thumb needs to be on the other side for the second glove. See note ** at end of pattern.
Thumb: CO 11 sts next to the carriage. Keep these sts, plus next 11 (22 sts total) in WP for thumb, and place remaining 49 sts into HP. K 19 rows even. Transfer EOS to adjacent needle. K 1 row. Clip yarn and thread into a tapestry needle. Remove 11 thumb sts on yarn tail.
Hand: Turn thumb down toward cuff and fold K sides together. Pick up 11 sts in CO edge at base of thumb and rehang on original needles. 60 sts again on machine. Cancel hold. K 18 rows even.
Pinky: Keep center 12 sts on machine. Remove 24 sts each side separately on WY. Pick up 1 stitch from heel of adjacent st on each side. 14 sts. K 17 rows even. Transfer EOS to adjacent needle, K 1 row and remove on yarn tail, same as for thumb.
Ring Finger: Replace all 48 sts held on WY onto needles 24L – 24R. to strengthen center joining point, pick up heels of sts under needles 1L and 1R, cross, and hang on opposite needles. K 3 rows. Keep center 14 sts on machine. Remove 17 sts each side separately on WY. Pick up 1 st from heel of adjacent st on each side. 16 sts. K 23 rows even. Transfer EOS to adjacent needle, K 1 row and remove on yarn tail.
Middle Finger: Replace 9 sts from each WY section. Pick up heels of sts under needles 1L and 1R, cross, and hang on opposite needles. Pick up 1 st from heel of adjacent st on each side. 20 sts. K 27 rows even. Transfer EOS to adjacent needle, K 1 row and remove on yarn tail.
Forefinger: Replace 8 remaining sts from R WY section onto needles 2-9 R of center 0. Pick up a st at base of middle finger and hang on needle 1R. Pick up a st from other side of middle finger and hang on needle 1L. Rehang remaining 8 sts from L WY section onto needles 2-9L of center 0. 18 sts. K 25 rows even. Transfer EOS to adjacent needle, K 1 row and remove on yarn tail.
Finishing: Try finger length to check fit. Add or subtract a few rows if necessary so each finger fits correctly. Whip stitch (overcast) all seams, using just edge loops, or sew knot to loop, going through only 1 strand, to make a flat seam. Very often the sts at the base of the fingers will be stretched and gapping. I tighten this area by duplicate stitching over the gaps, working the sewing yarn back and forth through the fabric as needed to close the holes and stretched spots. Gather tips, fasten securely, and work in all yarn ends.
Optional Cable Pattern: Work this on the side of center 0 that does not have the thumb. (Left side for first glove, right side for second glove.) After completing cuff, knit first 6 rows of hand. Using a pair of 2-prong transfer tools, cross cables on needles 5-6-7-8, 10-11-12-13, 15-16-17-18, and 20-21-22-23 from L (R) edge on this and every following 6th row. Remove the four stitches specified on two 2-prong transfer tools. Replace the left sts to the right needles; replace the right sts to the left needles. Drop and relatch sts 4, 9, 14, 19, and 24. It is often easier to knit if the relatched st is not returned to the corresponding needle until after knitting a row over the crossed cable sts. In fact, I usually don’t bother to relatch these sts until just before I remove the sts onto WY to begin knitting fingers. Instead, I drop the specified stitch, then bring the needle back to WP so that it will catch and knit. The resulting dropped stitches make a little extra ease for crossing the cables. But do make sure that these sts are relatched and back on their corresponding needles before beginning the Pinky finger, or there will be runs in the fabric.
** Second glove is knitted with all shaping in reverse. This is easiest to do by starting with the carriage on the right side for the first glove, and on the left side for the second glove. Then when pattern says “right”, substitute “left”, and vice versa.
One thing I have found helpful is to draw around the hand for the person who will be wearing the glove. Keep the pencil vertical at all times, and draw as close to the hand, especially the fingers, as possible. Often this will get the length close enough that no alteration to the completed knitting is needed.
This pattern is adapted from the book, Knitting For Bazaars And Gifts by Irene Woods, copyright 1988 and was uploaded onto the original Clearwater Knits website in 1997. This slightly revised pattern was uploaded in December, 2020.
