Ribbing
The LK 150 does not have a ribbing attachment available, so all ribs must be made manually, either by handknitting them, or by dropping and relatching stitches, thereby changing them into rib stitches.
Some patterns also use the instruction for this as “Knit — rows, convert to ribbing”, which is done by dropping and raveling stitches, then latching them back up as knit stitches. All of these terms mean the same thing.
In this tutorial we will focus on relatched (also knows as “reformed” or “converted”) stitches and this technique is described below.
This method may be used either at the beginning or end of the item.
Ribbing Worked Last
Use this method when ribbing is worked at the end of a garment piece, such as sleeves that have been knit from the top down. The same method may be used to work bottom bands; in this case, begin the garment section above the ribbing, casting on with waste yarn and ravel cord. After completing the piece, rehang it upside down, picking up the main color loops next to the ravel cord onto the required number of needles. For tighter ribbing, it is easy to decrease a few stitches, hanging two main color loops onto one needle for each desired decrease. If you have doubled any stitches, knit 1 row at main tension.
Tighten the stitch dial 2 numbers; ribbing is usually worked at tighter tension than the main fabric. Do not remove the waste yarn yet.
If you are knitting from the top down, and do not have waste yarn, it helps to run a lifeline through every stitch in the last row before beginning the ribbing.
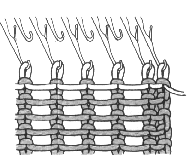
Live stitches are raveled down to the row where ribbing begins, and a lifeline prevents those stitches from running too far. You can use either a ravel cord or thick crochet cotton for this; thread it into a tapestry needle and make a running stitch through every stitch in the row right below the needles, taking care not to drop any stitches. It helps to pull down on the fabric with your non-dominant hand, and stitch with your dominant hand.
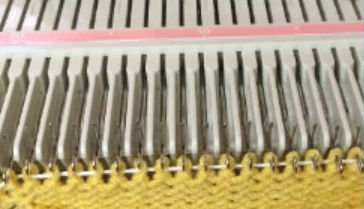
The white cord has been threaded in and out of every stitch while it is on the machine. It prevents stitches from running down too far when converting the rib stitches, and will be pulled out after ribbing is completed.
Step 1
For a practice piece, proceed as follows. Turn tension (Stitch Dial) at least two numbers tighter than tension used on main fabric. Depending on the yarn used, it will sometimes be necessary to go all the way down to “R” in order to get a firm ribbing. Knit 5 rows. Increase tension 5 numbers. Knit 1 row at loose tension. I usually turn the dial up 4 numbers, but this does vary with the yarn and whether the bound off edge needs to be stretchy.
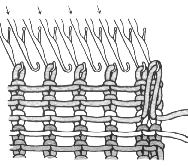
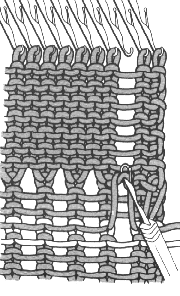
Drop third stitch from the right edge, and ravel it down 6 rows.. This is the row just above the ravel cord or waste yarn. It is easier to first nsert the latch tool through this stitch, then ravel down to the latch tool; by doing it this way, it is possible to pull down with the latch tool, helping the column of stitches run.
Be sure that the tool is actually inserted in the same column as the dropped stitch. Waste yarn or ravel cord will prevent the stitch raveling too far, but it is easier to get the latch tool into the correct stitch before it runs all the way down.
Step 2
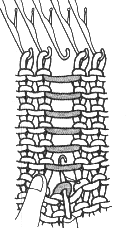
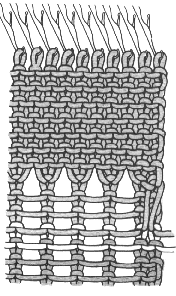
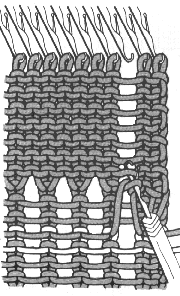
Catch the first bar of yarn (the first “rung” in the ladder) with the latch tool. Pull it back towards you, through the stitch which is already on the latch tool, forming a new stitch. Hint: be sure the latch closes around the strand of yarn before pulling it backwards; if the latch is open, it can get caught in the yarn.
Step 3
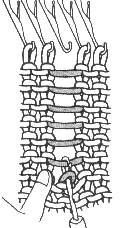
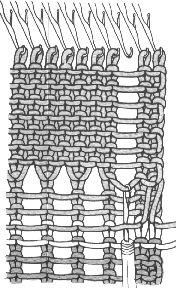
Repeat step 2 until all bars have been relatched, then rehang the stitch onto the empty needle. A vertical column of knit stitches on the purl background has just been formed. Repeat this process on every other stitch across for K1, P1 ribbing.
Bind off with the Stitch Through Stitch Bind Off method.
If you are also a hand knitter, you could remove the live stitches onto a needle (preferable a circular one, since that allows sliding the stitches to the other end in order to easily access the working yarn). Bind off loosely; a larger size needle works best.
Ribbing Worked First
Step 1
Bring forward required number of stitches for garment section. For this tutorial, we will presume that this piece has an even number of stitches. Beginning with 3rd needle from right edge, return every other needle back to pos. A (out of work). Cast on over remaining needles with waste yarn. Hang cast on comb. Set tension (Stitch Dial) to “R” . Knit approximately 1″, ending with carriage on left. Knit 1 row ravel cord. Carriage is now on right.
Step 2
Change to main color yarn. Knit 3 rows. On right edge of knitting, pick up the loop between the first two stitches, just above the ravel cord. Hang this on the end working needle, forming a long loop. Hang edge weights.
Step 3
Bring the alternate needles (the ones that were pushed back to pos A in step 1) out to pos B. They will now knit. Set row counter to 000. Knit 8 rows. Depending on the yarn, it may be necessary to increase the tension (Stitch Dial) one or two numbers.
Step 4
Remove cast on comb and edge weights. Drop stitch off 3rd needle from right edge (bring needle all the way forward, then push all the way back, and stitch will slip off.) Run it all the way down to the ravel cord. Insert the latch tool under the first bar of main color in the run. Skip over the top of the next 2 bars. Catch the 4th bar in the latch hook.
Step 5
Pull the latch tool back towards you, allowing the first bar to slip off the hook. This forms a new stitch.
Step 6
Catch the next bar of yarn (the next “rung” in the ladder) with the latch tool. Pull it back towards you, through the stitch which is already on the latch tool, forming a new stitch. Repeat until all bars have been relatched.
Return to LK150 tutorial index
This tutorial was copyrighted and uploaded to the original Clearwater Knits website in 1997. It was updated in 2017.